When developing custom detection programs, development is typically done on a development machine (Linux/Windows/Mac) rather than directly on a Raspberry Pi.
We provide a stub module that allows you to run the aicap command in such a development environment.
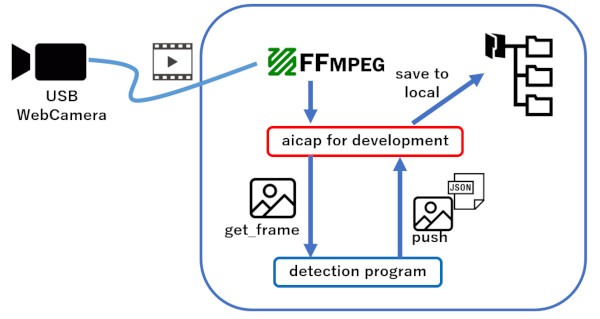
This stub module (Development aicap Command) has the same command arguments as the aicap command built into AIBOX OS. By placing it in your system path, you can develop custom detection programs on your PC.
The development aicap command uses a USB-connected webcam on your development PC. Push notification images and JSON strings are saved to a specified local directory.
The development aicap command uses FFmpeg, so please install it in your development environment.
Here are the installation steps for the development aicap command.
The configuration file (aicap.conf) required to run the command will be explained in the next step for each environment.
Install FFmpeg appropriate for your development environment.
Please refer to other resources for installation instructions.
Download the development aicap command appropriate for your environment from GitHub.
Connect a UVC camera to a USB port on your development machine.
Create a configuration file for the development aicap command.
The creation steps will be explained in the next section.
Set the path to the location where you placed the development aicap command so it can be run directly.
You can add it to your system PATH, or if you're using Visual Studio Code, you can add PATH to the env in launch.json to run the command.
{
    "version": "0.2.0",
    "configurations": [

        {
            "name": "Python Debugger: Current File",
            "type": "debugpy",
            "request": "launch",
            "program": "extmod.py",
            "console": "integratedTerminal",
            "args": [],
            "env": {
                "MODEL_FILE_NAME" : "yolo11m.pt",
                "PREVIEW_IMAGE_PATH" : "C:/Users/yukio/Desktop/temp/result.jpg",

                // On Windows, PATH separator is [;]
                // On Linux/Mac, use [:]
                "PATH": "${env:PATH};C:/Users/yukio/work"
            }
        }
    ]
} To use the development aicap command, you need to create a configuration file.
Create the configuration file in the same directory as the development aicap command with the name aicap.conf.
The format is JSON, and there are two parameters:
{
    "VideoCaptureDevice" : [USB webcam connection information],
    "PushResultOutputPath" : [Directory to save images/JSON data specified in Push command]
}
VideoCaptureDevice acquisition and configuration methods differ for each environment. Here are the instructions for each:
Install V4L2 (Video for Linux2) if not already installed. (sudo apt install v4l2-utils)
Use v4l2-ctl --list-devices to display the device path of the connected UVC camera
$ v4l2-ctl --list-devices

Microsoft® LifeCam HD-3000: Mi (usb-0000:00:0b.0-1):
	/dev/video0
	/dev/video1
Set the one with the lower number. (In the above example, /dev/video0)
{
    "VideoCaptureDevice" : "/dev/video0",
    "PushResultOutputPath" : "/home/user/work/temp"
}
Enter "ffmpeg -list_devices true -f dshow -i dummy" in the command prompt
$ ffmpeg -list_devices true -f dshow -i dummy

[dshow @ 000002d291eebb80] "HD Webcam eMeet C960" (video)
[dshow @ 000002d291eebb80]   Alternative name "@device_pnp_\\?\usb#vid_328f&pid_2013&mi_00#7&39fbeec7&0&0000#{65e8773d-8f56-11d0-a3b9-00a0c9223196}\global"
[dshow @ 000002d291eebb80] "Microphone (HD Webcam eMeet C960)" (audio)
[dshow @ 000002d291eebb80]   Alternative name "@device_cm_{33D9A762-90C8-11D0-BD43-00A0C911CE86}\wave_{44545183-13C6-4A8E-A80C-20BD4E517837}"
Set the name of the video device. (In the above example, HD Webcam eMeet C960)
{
    "VideoCaptureDevice" : "HD Webcam eMeet C960",
    "PushResultOutputPath" : "/home/user/work/temp"
}
Enter "ffmpeg -list_devices true -f avfoundation -i dummy" in the terminal
$ ffmpeg -list_devices true -f avfoundation -i dummy

[AVFoundation indev @ 0x7f8b4af05000] AVFoundation video devices:
[AVFoundation indev @ 0x7f8b4af05000] [0] Microsoft® LifeCam HD-3000
[AVFoundation indev @ 0x7f8b4af05000] [1] Capture screen 0
[AVFoundation indev @ 0x7f8b4af05000] AVFoundation audio devices:
[AVFoundation indev @ 0x7f8b4af05000] [0] Microsoft® LifeCam HD-3000
Set the number of the video device. (In the above example, 0)
{
    "VideoCaptureDevice" : "0",
    "PushResultOutputPath" : "/home/user/work/temp"
}
Set the number as a string.
Once the PATH is set correctly, the usage is the same as the aicap command built into AIBOX OS. This means that custom detection programs developed in your development environment can be deployed directly to AIBOX.